 Calisthenics offers a great way to build strength and improve fitness using mostly your own body weight. While fancy commercial gyms are packed with all kinds of equipment, you can perform an impressive range of movements at home with minimal gear, and you don’t need to spend a fortune for a solid home setup.
If high prices for namebrand calisthenics stations or gym memberships have you putting off your training goals, you’re not alone. When I made my own switch to at-home workouts, I was surprised by how easy it was to put together effective equipment using supplies I already had or could buy cheaply.
All you really need for calisthenics is some creativity and a willingness to get handson. This guide covers practical, budgetfriendly DIY solutions to help you set up your own calisthenics equipment at home without blowing your budget. In this article, we’ll jump into the details for each major piece of gear, offering ideas, tips, and creative approaches to keep costs low and get you moving toward your goals.
1. Pull-Up Bars: Affordable Options for Any Home
Pull-ups are one of my favorite bodyweight exercises, and building a pullup bar doesn’t have to be complicated or expensive. One popular approach is using galvanized steel pipes from your local hardware store. These pipes are strong, come in various lengths, and connect easily with threaded fittings. Mount them in a doorway, between sturdy beams, or even outdoors as a standalone bar with some concrete and wooden posts. Pullups are a staple for upper body strength and a must-have for a complete calisthenics setup.
What You’ll Need:
- Galvanized steel pipe (1” diameter is comfortable for grip)
- Pipe fittings and flanges for mounting
- Sturdy wood or metal supports if building a freestanding unit
- Basic tools (drill, screws, wrench)
For rented spaces or apartments, I recommend getting a doorway pullup bar. Many basic models are less expensive than most people expect and require no tools for installation or removal, leaving no marks behind. Just check the weight limits and user reviews to make sure the bar feels solid and safe during use. An extra tip: slip a bit of soft foam tubing over your bar for comfort, especially if you plan long sets or have sensitive hands.
2. Parallettes: DIY for Dips, Handstands, and More
Parallettes are one of the best multiuse pieces of equipment I have in my home gym. These low to the ground bars help with pushups, dips, Lsits, and they’re an essential tool for handstand practice. Having a pair lets you crank out deeper pushups and gives a boost to wrist comfort, too.
How to Build Simple Parallettes:
- Pick up PVC pipes (Schedule 40, 1 to 1.5 inches thick) and matching elbow and Tjoints from the hardware store.
- Cut pipes to your desired length, roughly 12-18 inches for hand placement, 6-8 inches high for most uses.
- Assemble using the PVC joints, then glue everything together for safety and stability.
Wooden parallettes are also easy to make with dowels and scrap wood. Solid construction really matters for safety. I always doublecheck joints and connections before every workout. If you’re looking for a slight height boost, you can stack parallettes on rubber pads or a folded towel, but only if they’re stable.
3. Dip Bars: Budget Builds for Upper Body Strength
Dips are a classic calisthenics move, and solid dip bars make a huge difference. You can build a pair from sturdy wood or steel pipes. I like to use two sawhorses as a quick, moveable option. Just make sure they are the right height and do not wobble during use. Dip bars let you work chest, shoulders, and triceps with bodyweight resistance, making them a big step up from floor dips.
DIY Dip Bar Ideas:
- Use parallel steel or PVC pipes mounted between solid supports (walls, posts, or concrete blocks).
- Build Aframe dip bars from 2×4 lumber and bolts, anchoring the base for stability.
- Repurpose sturdy household items like chairs or a pair of strong tables set side by side.
Always test your setup with gentle pressure and bodyweight before starting intense workouts, especially if you’ve used recycled or reclaimed materials. Checking for wobbling or cracks can help you avoid injury. If you want more grip or comfort, you can wrap handles with sports tape or thick fabric.
4. Resistance for Pulling and Mobility Movements
Not all calisthenics moves are about pure strength. Flexibility and mobility are super important, and a few elastic bands or ropes add tons of variety. I use resistance bands for assisted pullups, stretching, and improving mobility. While bands are cheap to buy new, I’ve also made my own using bicycle inner tubes or old climbing slings. Tie a knot for a handle, loop it over your pullup bar, and you’re ready to go. Having bands on hand lets you practice pullups even if you aren’t yet able to do a full unassisted rep.
Simple AddOns:
- Old towels or rope tied in loops for pulling or suspension exercises
- Soft foam or pipe insulation for grips and comfort
- Ankle weights filled with rice or sand for progressive workouts
Check your DIY bands before each use for signs of wear or damage. It’s always better to replace homemade resistance bands if you have any doubts, since they’re easy to make and very low cost. As you improve, using multiple bands or thicker materials can add more resistance, adding new challenges to your routine.
5. Weighted Vests and Homemade Sandbags
When bodyweight exercises start feeling easy, adding a bit of weight helps you progress. Commercial weighted vests and sandbags can be expensive, but making your own is pretty straightforward. For a weighted vest, I fill pockets of an old backpack with bags of rice or sand (tightly sealed), then strap it securely while working out. For sandbags, use a duffel bag or an old gym bag and fill it with smaller, sealed bags of sand, gravel, or rice. You can also combine small hand weights or bottles filled with water for added load if sand is messy or not available.
Lifting and carrying homemade sandbags can add a functional training element to your routine, working muscles in different ways than standard calisthenics. Weighted backpacks are also great for activities like stepups, squats, and lunges. Just make sure to adjust weight evenly to avoid pulling on shoulders or causing strain.
6. Flooring and Gym Mats on a Shoestring
Having a safe surface to train on matters, especially if you plan on doing exercises where you might fall or put pressure on your wrists and knees. I use old yoga mats layered over cardboard for basic cushioning. Puzzle style foam mats often go on sale at hardware stores and are easy to cut to fit any space. Even a large rug can work if you’re short on options.
If you’re exercising outdoors on grass or dirt, just keep your workout zone free of rocks and debris to prevent trips or injuries. For added cushioning, try laying down towels or old blankets if mats aren’t available. Just remember that firm footing is also important for balance moves and landings during dynamic exercises.
If your budget is tight, you can even use flattened cardboard boxes under a blanket for short-term shock absorption. Many community centers or parks also have outdoor workout spaces with rubber flooring you can take advantage of for free during nice weather.
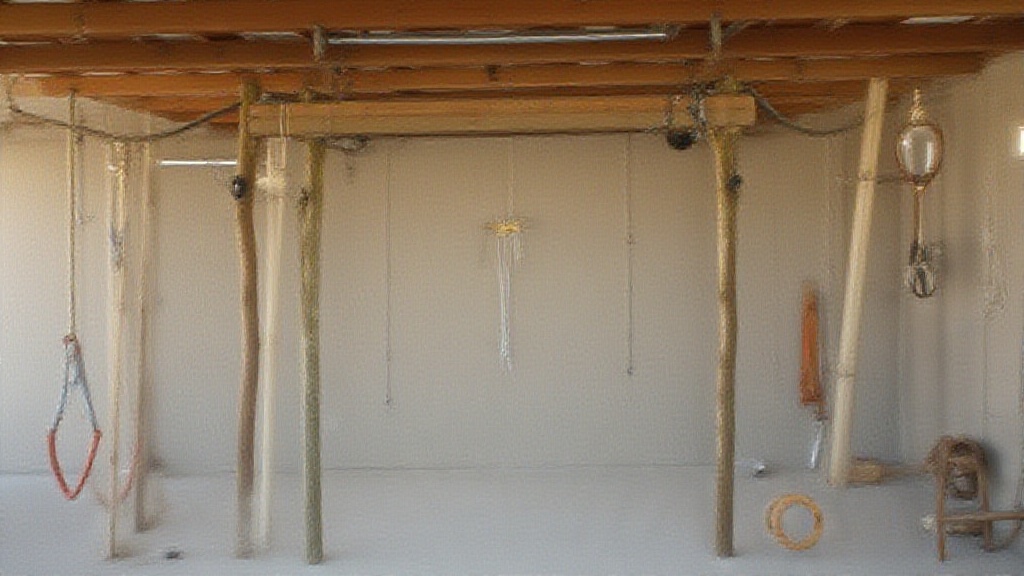
7. Rings and Suspension Trainers: Budget-Friendly Alternatives
Suspension trainers and gymnastic rings can add a lot to a calisthenics routine, increasing challenge and versatility. Instead of buying a new set, I’ve used wooden rings made from smooth plywood (cut and sanded by hand), or even strong plastic rings recovered from toys. Heavyduty nylon webbing or ratchet straps with buckles work well for hanging rings from trees or doorways. Always check the weight rating of straps and anchors, and hang the rings from something solid (like your homemade pullup bar or a sturdy beam). Rings let you practice pullups, dips, rows, and also test balance with a new form of resistance.
If you’d like more training ideas, search for bodyweight ring workouts online—there are lots of creative routines you can try, many from experienced athletes who share their tips freely.
Final Thoughts
Setting up a home calisthenics gym is much easier and more budgetfriendly than many people think. With a few basic tools, a visit to the local hardware store, and some creativity, you can build your own equipment that fits your workout needs perfectly. Always test your setups for safety, and don’t hesitate to improve or replace homemade gear as you go. DIY equipment isn’t only costeffective; it also gives your workouts a personal touch and helps you learn new skills along the way.
If you’ve built your own calisthenics gear or have other ideas for affordable fitness equipment, I’d love to hear about your projects and tips below. Remember, there’s no single “right way”—mix and match materials, make adjustments for your space, and keep having fun as you build strength from home. Your setup can be as unique as your routine, and even small improvements can make a big difference over time.